CLOUDWALKS
  • Home
  • QuickBooks Hosting
    • QuickBooks Enterprise Hosting
    • Quickbooks Premier Hosting
    • Quickbooks Pro Hosting
    • Quicken Hosting
    • QuickBooks FAQ
    • Sage Hosting >
      • KB >
        • How to connect from Mac
        • Set-up Users in QuickBooks
      • Sage 50 Hosting
  • Free Trial
  • Pricing
  • Data Centers
  • Contact Us
    • Remote Session
    • Clients Review
  • Blog
  • About Us

Blogs

Home
Pricing

The Initial Setup for Using QuickBooks Payment

10/1/2018

0 Comments

 
QuickBooks Payment
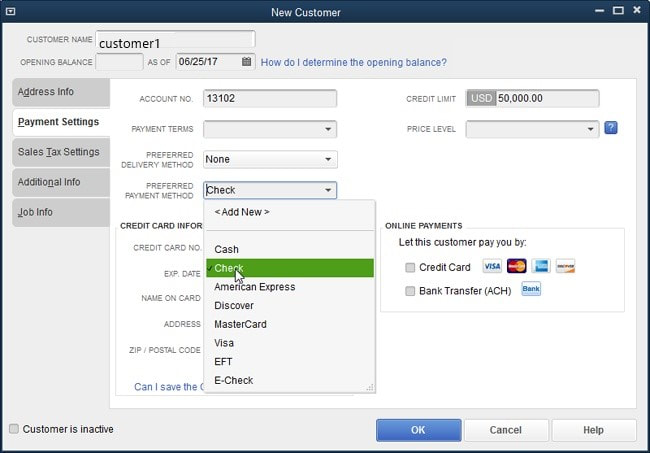
Receiving and making payments as a small business owner is a big problem because there are multiple clients and vendors with numerous dates to remember. In such a situation, you will need an effective software solution which can help you in managing your payments without any hassle and worries. ​
There are multiple options for payment software, but with QuickBooks as your payment partner, everything becomes facile in your business. By connecting your bank account with your QuickBooks software, you will be able to easily manage your payments while keeping a real-time track on it.
Whether it is accepting payments through debit card, credit card or PayPal, QuickBooks helps you in all sorts of payment methods. So, in this blog post, we will be looking at the initial setup of QuickBooks payment through which you will be able to use all the payment features of QuickBooks.

Connecting your payment account with your QuickBooks
After connecting your payment account with your QB, you will be able to send and receive invoices. These invoices can be directly deposited to your account. Follow the below-mentioned steps in order to do the same:
  • In the QuickBooks, click on Customers and then on the Link Payment Service to company file
  • After that, you will need to enter your User ID and Password which you created for signing in and then choose Link Service.
  • Then choose Transfer
  • And finally, after being prompted, give confirmation to the transfer of your service by clicking on Yes, Transfer.

​If the above-mentioned process doesn’t work for you then you can choose this alternative as well.
  • First of all, you will need to open the QB company file
  • Then choose Receive Payment from the home screen. It will open the option of the Customer Payment window.
  • Now from the drop-down menu of Payment Method, you will need to choose an appropriate card type.
  • Then you will have to place a checkmark in the Process credit card payment when saving check box.
  • After that, from the pop-up window, you will have to place a checkmark next to Link to an Existing Merchant account and then choose Ok.
  • Finally, you will have to login to with your credentials of the registered account.

Changing contact or business information for your Payment account in QB
Here is the list of business information which you can change in the Payment
  • Ownership Type
  • Tax ID
  • Website Address
  • Doing Business As
  • Legal Business Name
  • Industry Type
  • Contact information

Updating your information in the Payment accounts
  • First of all, you will have to sign in to your Merchant Service Center using the login credentials of your Payment accounts.
  • Now from the top menu, you will have to choose the Account>Account Profile.
  • Now, according to your need, perform the following steps
  • In order to change the account holder/business information, you will have to the same section and then choose update. Then after making the changes, you will have to click on Submit.
  • In order to change the contact information, you will have to same section and choose Edit. Then, after making the desired changes, you will have to click on the Save button. ​

Preeti

​Preeti is a technical content writer who is currently associated with Cloudwalks. She spends most of the time of her day in the world of cloud computing and accounting software. Her vast experience in the field of cloud software and her love for IT has allowed her to become a major contributor on most of the knowledge based cloud platforms.


Recommended Articles:

Tips for Making Navigation a Pie in Hosted QuickBooks

Using the Income Tracker Feature of QuickBooks
​

How to Setup Email in QuickBooks?


0 Comments

Your comment will be posted after it is approved.


Leave a Reply.

    RSS Feed

    Most useful blogs

    6 productivity tips
    Why Choose Cloud Accounting
    QuickBooks Hosting for business

Hosted Applications

QuickBooks Hosting
QuickBooks Cloud
Quickbooks Pro
Quickbooks Premier
QuickBooks Enterprise
Quicken Cloud
Hosted QuickBooks Cloud

Tax Hosting Services

ATX  Tax Hosting
ProSeries Tax Hosting
Drake Software Hosting
Lacerte Tax Hosting
Free Trial
Security and Reliability
Privacy Policy
​User Acceptance Policy

Accounting Applications

Peachtree Hosting
Sage 50 Hosting
Quicken Hosting

Data Backup
Plans and Pricing
Help Videos

Schedule

Contact

Address
Cloudwalks Hosting, Inc.
40 Exchange Place, Suite 1602
​New York, NY 10005
Picture
© Copyright 2025 Cloudwalks Hosting, Inc.
Picture
Picture
  • Home
  • QuickBooks Hosting
    • QuickBooks Enterprise Hosting
    • Quickbooks Premier Hosting
    • Quickbooks Pro Hosting
    • Quicken Hosting
    • QuickBooks FAQ
    • Sage Hosting >
      • KB >
        • How to connect from Mac
        • Set-up Users in QuickBooks
      • Sage 50 Hosting
  • Free Trial
  • Pricing
  • Data Centers
  • Contact Us
    • Remote Session
    • Clients Review
  • Blog
  • About Us